let obj = {};

  • 이것은 객체 리터럴 방식으로 객체를 생성하는 가장 간결한 방법
  • 자바스크립트에서 객체를 만들 때 많이 사용되며, 성능 면에서도 new Object()보다 더 빠르다고 알려져 있다
  • 사용하기 쉽고 직관적

let obj = new Object();

  • 이것은 자바스크립트의 내장 생성자 함수인 Object()를 사용해 객체를 생성하는 방법
  • 객체를 생성할 때 별도의 매개변수를 전달해야 하는 경우에 사용할 수 있다
  • 하지만 일반적인 객체 생성에서는 거의 사용되지 않는다

주요 차이점

  • 구문: let foo = {};는 객체 리터럴 방식, let foo = new Object();는 생성자 함수를 사용한 방식
  • 성능: 객체 리터럴 방식이 더 간결하고 성능이 약간 더 우수
  • 사용성: 대부분의 상황에서 객체 리터럴 방식을 사용하는 것이 일반적이고, 더 직관적


Posted by 비니미니파파

삼항 연산자
count = ( $("#count").val() != "" ) ? parseInt($("# count").val()) : 0;

논리 연산자
count = parseInt($("# count").val()) || 0;

  • 삼항 연산자는 조건부 선택을 통해, 조건이 true인지 false인지에 따라 서로 다른 값을 반환
  • || 연산자는 단순 논리 OR로, 첫 번째 truthy 값을 반환

단순 값이 없을때 default 값을 정해야 할때. || (or 연산자)를 사용하면 편함.

Posted by 비니미니파파

https://nodejs.org/download/release/v10.24.1/


Index of /download/release/v10.24.1/


nodejs.org


NodeJs 버전은 10.x.x 사용

node-gyp 은 6.1.0 사용

~]# npm install -g node-gyp@6.1.0

끝!!!


Posted by 비니미니파파

 table header 를 html thead tr 사용 하지 않고 정의 하기

<table id="example" class="display" style="width:100%">
    <thead>
    </thead>
</table>


<script>

$('#example').DataTable( {
  columns: [
	{"data":"mdate","title":"날짜"},
	{"data":"username","title":"이름"},
	{"data":"tel","title":"연락처"}
  ]
} );

</script>


Posted by 비니미니파파

npm 으로 원하는 버전 설치하기 중요 

node-gyp 을 원하는 버전 6.1.0으로 설치하고자 할때는

node-gyp@version 형식으로 설치 하면 된다. 

~]# npm install -g node-gyp@6.1.0

버전 확인

~]# node-gyp -v
v6.1.0
Posted by 비니미니파파

Nodejs 홈페이지에서 원하는 릴리즈를 찾아서 다운받으면된다.

https://nodejs.org/ko/download/releases/


이전 릴리스 | Node.js

Node.js® is a JavaScript runtime built on Chrome's V8 JavaScript engine.

nodejs.org

다운 받은 nodejs 를 원하는 폴더에 압축을 풀고

예) /usr/local/node/

path 를 추가 하자.

~]# export PATH=$PATH:/usr/local/node/bin/

시스템에 등록하고 싶을 때는

~/.bash_profie 에 스크립트를 추가하면 된다. ( ~ 리눅스에서 사용자 홈디렉토리 이다.)

마지막줄에 추가

~]# vi ~/.bash_profie

-- 마지막 줄에 추가 --
export PATH=$PATH:/usr/local/node/bin/

node 명령어를 실행해 보면 잘된다.

*** npm 으로 원하는 버전 설치하기 중요 ***

node-gyp 을 원하는 버전으로 설치하고자 할때는 @버전 형식으로 설치 하면 된다. 

~]# npm install -g node-gyp@6.1.0


끝!!!

Posted by 비니미니파파

먼저 nodejs 가 설치되어 있어야 한다.

프로젝트 디렉토리를 생성 한다. ( 예 : pjtest )

visual studio code 를 실행 후 폴더를 연다.

nodejs 나 electron 개발 시 visual studio code 가 좀 더 편한거 같다.

터미널을 연다.

터미널에서

~> npm init
This utility will walk you through creating a package.json file.
It only covers the most common items, and tries to guess sensible defaults.

See `npm help init` for definitive documentation on these fields
and exactly what they do.

Use `npm install <pkg>` afterwards to install a package and
save it as a dependency in the package.json file.

Press ^C at any time to quit.
package name: (pjtest)
version: (1.0.0)
description: Test Project
entry point: (index.js)
test command: start
git repository:
keywords:
author:
license: (ISC) MIT
About to write to C:\dev\vstudio\workspace\pjTest\package.json:
{
  "name": "pjtest",
  "version": "1.0.0",
  "description": "Test Project",
  "main": "index.js",
  "scripts": {
    "test": "start"
  },
  "author": "",
  "license": "MIT"
}


Is this OK? (yes) y

package.json 이 생성되었으면 반은 성공

일렉트론을 설치해 보자

~> npm install --save-dev electron

added 87 packages, and audited 88 packages in 21s

6 packages are looking for funding
  run `npm fund` for details

found 0 vulnerabilities

설치완료 스타트(start) 스크립트 설정

package.json 을 열고 script 부분을 아래와 같이 변경한다.

  "scripts": {
    "start": "electron ."
  },

{
  "name": "pjtest",
  "version": "1.0.0",
  "description": "Test Project",
  "main": "index.js",
  "scripts": {
    "start": "electron ."
  },
  "author": "",
  "license": "MIT",
  "devDependencies": {
    "electron": "^13.1.9"
  }
}

설정은 끝났다. 실행할 파일을 만든다. ( index.js , main.html )

index.js

const { app, BrowserWindow } = require('electron')
const path = require('path')

function createWindow() {
    const mainWindow = new BrowserWindow({
        width: 800,
        height: 600
    })

    mainWindow.loadFile('main.html')

}

app.whenReady().then(() => {
    createWindow()

    app.on('activate', function () {
        if (BrowserWindow.getAllWindows().length === 0) createWindow()
    })
})

app.on('window-all-closed', function () {
    if (process.platform !== 'darwin') app.quit()
})

main.html 을 만든다.

<!DOCTYPE html>
<html>
  <head>
    <meta charset="UTF-8">
    <!-- https://developer.mozilla.org/en-US/docs/Web/HTTP/CSP -->
    <meta http-equiv="Content-Security-Policy" content="default-src 'self'; script-src 'self'">
    <meta http-equiv="X-Content-Security-Policy" content="default-src 'self'; script-src 'self'">
    <title>Hello World!</title>
  </head>
  <body>
    <h1>Hello World!</h1>
    We are using Node.js <span id="node-version"></span>,
    Chromium <span id="chrome-version"></span>,
    and Electron <span id="electron-version"></span>.
  </body>
</html>

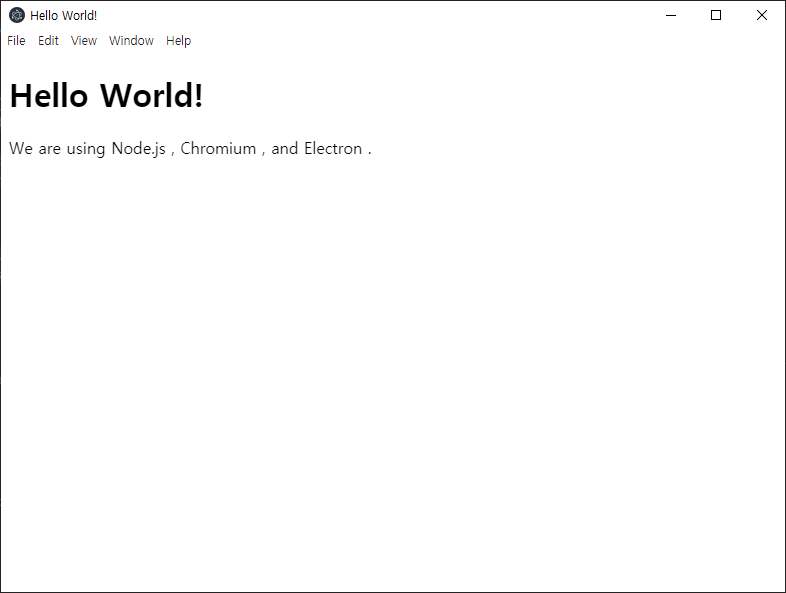
터미널에서 실행해 본다.

~> npm start


끝...

자세한 공부는 아래에서 하자.

https://www.electronjs.org/docs/tutorial/quick-start

Posted by 비니미니파파

기존 방식 


function sum(a,b) {
   var c = a + b;
   return c;
}

sum(1,2); // 3


var sum = function (a,b) {
   var c = a + b;
   return c;
}

sum(1,2); // 3

ES6 화살표 함수

function 생략(삭제) (a,b) {  사이에 화살표를 삽입 (a,b) => {


let sum = (a,b) => {
   let c = a + b;
   return c;
};

sum(1,2); // 3

참 쉽죠 ^^

객체 함수(?) 뭔가 복잡해 보이지만 있어 보이는 함수

const  calc = { 
  sum: (a,b) => { 
    return a+b;
  }, 
  sub: (a,b) => {
    return a-b;
  } 
};

calc.sum(1,2); // 3

calc.sub(4,1); // 3


w3scholos.com

https://www.w3schools.com/js/js_arrow_function.asp

Posted by 비니미니파파
	"columns" : [
	    	{"data" : "no","defaultContent":""},				
	    	{"data" : "name","defaultContent":""},
	    	{"data" : "user_id","defaultcontent":""},				
	    	{"data" : "",
	    		render: function(data,type,row){
	    			return "<button id='btn_info' type='button' class='btn' onClick='openInfo("+row.user_id+")'>상세정보</button>";
	    		}
	    	}
	],


function openInfo(user_id) {

	// Table 에서 받은 user_id 출력
	console.log(user_id);
    
}
Posted by 비니미니파파
JavaScript&Platform/jQuery2020. 9. 10. 10:47

<select id="choice">
   <option value="1">하나</option>
   <option value="2">둘</option>
   <option value="3">셋</option>
</select>

<script>

    $("#choice").val("2").prop("selected",true);

</script>


* jquery 환경에서 실행 됩니다.

+ 추가 +

change 이벤트가 발생하지 않을 때

    $("#choice").val("1").prop("selected",true).change();


Posted by 비니미니파파
  • l - length changing input control
  • f - filtering input
  • t - The table!
  • i - Table information summary
  • p - pagination control
  • r - processing display element


https://datatables.net/reference/option/dom


정리는 나중에

Posted by 비니미니파파
JavaScript&Platform/jQuery2018. 7. 10. 17:51
<div class="row"> 
    <div class="foo"">aaa</div> 
    <div class="foo"">bbb</div> 
    <div class="foo"">ccc</div> 
</div
 

Div  class foo 를 click 했을 때 index 를 찾아 보자


$( ".foo").click(function() {
    var index = $(".foo").index(this);
    cosole.log(index);
});

Browser Console ( chrome + F12 ) 에 찍히는 것을 확인할 수 있다!

aaa click -> 0

bbb click -> 1

ccc click -> 2

Posted by 비니미니파파
JavaScript&Platform/jQuery2016. 12. 29. 14:29

Div layer 를 이용한 팝업 호출 시

ajax 대신 load 를 이용하면 간단 히 작성 할 수 있음.

변경전

// Popup 
var popup = {};
// 
popup.openPop1 = function() {
    $.ajax({
        url: "popup/pop1.html",
        async: false,
        success: function(html){   
            $("#popDiv").html(html);
            // Popup 호출 후 실행 function
            popDiv.show();
        }
    });
}

변경 후

// Popup 
var popup = {};
popup.openPop1 = function() {
   $("#popDiv").load("popup/pop1.html",function(){
       // Popup 호출 후 실행 function
       popDiv.show();
   });
}
Posted by 비니미니파파
JavaScript&Platform/jQuery2016. 5. 12. 10:46
 var url = ""; // URL
 var params = ""; // Request Parameters

 $.ajax({
     type:"POST",
     url: url,
     dataType: "json", // html, xml, text, script, json, jsonp
     async: true, // true, false
     data: params,  
 })
 .done(function(data){
     // Success Call Back
     console.log("SUCCESS..............");
 })
 .fail(function( e ) {
     // Fail 
     console.log("FAIL..............");
 });

'JavaScript&Platform > jQuery' 카테고리의 다른 글

[jQuery] Div click index  (0) 2018.07.10
[jQuery] .load() 사용  (0) 2016.12.29
[jQuery] table row 홀수, 짝수 배경색 지정하기  (0) 2014.12.12
[jQuery] 숫자 자동 증가 animation  (0) 2014.12.11
[jQuery] jquery ajax  (0) 2013.04.08
Posted by 비니미니파파
JavaScript&Platform/jQuery2014. 12. 12. 12:01


<script>
       // table row background-color change
        $(function(){
        $('tr:odd').css('background-color','#FFFFFF');  // 홀수
        $('tr:even').css('background-color','#f6f6f6');   // 짝수
        $('tr:first').css('background-color','#cdcdcd');  // 테이블 헤드
        });        
 </script>

Posted by 비니미니파파